
A Filipino Classic: Chicken & Pork Adobo
Based on the NYT Recipe by Angela Dimayuga
Ingredients:
2-3lb of bone in, skin on Chicken thighs (if you shop at Costco it is approximately 2 of the smaller packages)
2lb of pork belly (also purchased at Costco)
1-2heads of garlic
1 can of Unsweetened Coconut milk (This is just shy of 2cups)
1 1/2 - 2 Cups of Coconut Vinegar (if you do not have an Asian Market near you, try a health food store)
1-3 Tablespoons of Peppercorn
2-4 Tablespoons of Coconut oil
Bay Leaves…10-20leaves
1/4 to 1/2 cup of Soy Sauce (this will increase the NaCl content of the dish, so mind your seasoning)
Note: I am cooking for a household of 3 adults, 3yr old and a voracious teenager. In addition to the people eating, I try to cook in an over abundance to make cooking throughout the week more manageable as I am the personal chef for The Motley Crew.
Instructions:
Peel and coarse chop the garlic…if you cut it thin, they may burn!
Cube the pork belly and trim the excess fat off of the chicken thighs
Heat up a put big enough for the meat and liquid. For some reference, I used a 7qt Dutch Oven.
Temp should be at medium
Add 1-2 Tablespoons of coconut oil
Sear the pork belly.
Do not over crowd the cooking surface. The fat will render out assisting in the cooking process.
Place the pork belly in a circle formation, clockwise, so you can keep track of the pieces of meat cooking. Make sure all the sides are browned.
Once you are finished searing the pork, sear the chicken thighs, skin side down first.
Once finished searing, remember all sides should be brown.
The meat should not be cooked all the way through!
Sauté the garlic and peppercorns
The garlic should come to a nice toast (do not burn!)
Add the seared chicken, skin side down and then the pork belly
Add the coconut milk, soy sauce
Break bay leaves in half and add
Let it come to a simmer
Add Vinegar
Lower the heat to low and let it work its magic with an occasional stir to make sure things do not stick to the bottom
cook until the chicken falls off of the bone with minimal effort
Taste and adjust, if needed
You can also simmer down (reduce the liquid) to thicken the sabaw, sauce. The sauce should be like most Filipinos…silky and smooth.
Serve with fresh rice!

Where is the meat?
Just finished cutting the pork and rinsed off the chicken.

Everyone into the POOL!
I finished searing the pork belly and seared the chicken thighs, skin side down only. Everyone was getting antsy and I needed dinner sooner rather than later.
Note, the toasted garlic bits. Toast the garlic in the oil…it will infuse the oil enhancing the flavor of the dish.

Coconut Milk…adds a delicious richness
Also bought at Costco in a case of 6.

The Acid…
Can be difficult to find. Look for it in your Asian Market or gourmet grocery stores. If those two option come up with nothing, try a health food store like Vitamin Shop or other natural/organic stores in your area. You will need acid for this dish for that tangy flavor. As a sub, you can use the ole reliable, white vinegar.

Sauce is getting there..
Everyone is in the pool and the sabaw (sauce/liquid) is not quite at its optimal silkiness. 15-20 more minutes and then everyone can eat.
This is definitely a keeper, according to MBW and Anak 1. This is essentially a braised dish where you sear the meat then slow cook in a liquid. Somethings that I would like to try when I make Adobo again is slow cooked in the oven with different types and cuts of meat. I would also like to play with the texture…maybe air fry the meat to a crisp maybe even encrusting the meat in panko, breadcrumbs or even a lechon kawali style of crunchiness pork belly.
Adobo is a dish that is found throughout the Philippines and every household has at least 1 relative that makes “The BEST” Adobo. Growing up in the states, it was difficult to find the coconut vinegar. The Adobo dishes that I grew up with had mostly white vinegar.
If you are the type of set it and forget it chef, for sure this dish as any braise dishes can be done in an Instapot. Most Instapot has a sauté setting where you can sear the meat and or sauté the aromatics. I SLAVED over the stove as this was my first time cooking this dish, so i wanted more control in the taste and texture. With an overwhelming yes, this will be added into the rotation of dishes here.
As with all the recipes I have posted, these are just guidelines. Push the boundaries of your creativity and make it your own!
T

Pho does a body good
This is pure deliciousness…
This was the second time I made pho. The first time I made this, the taste was delicious but I felt the broth needed more body to it. This time around, i added the beef concentrate. It totally made the difference and added the body I was looking for in the broth. Traditionally, the broth is made of bones, tendon and brisket. Boiled over night at low heat. Who the fuck has time to do that? I have dinosaurs to name, forts to build, making sure both boys use soap when washing and whole bunch of other shit that needs to get done. So, needless to say, the shortcut saved the time and on the gas bill. Note, the addition of the beef concentrate will alter the salt content so taste and salt accordingly!
Ingredients:
Meat:
Ox Tail, dual pack bought at Costco
1 NY Strip, 2” thick
Seasoning and Aromatics:
Roasted on the burners:
Ginger Root
Onion
Shallot
Placed in cheese cloth:
2 sticks of Cinammon
15ish Star Anise
10-15 cloves
1-2 Tablespoons of Coriander seeds (you can use powdered added to the water)
8-12 Tablespoons of Fish Sauce
NaCl to taste…you can use additional fish sauce, soy sauce and or hoisin sauce
Garnish:
Diced scallion
Dices Cilantro
Shredded Carrots
Vegetables:
Kale
Carrots (if you do not want it as a garnish)
Noodles:
Rice Noodles are traditional, I think I’m using Ramen
Cheat:
1 Tablespoon of Better than Bullion Beef Flavor. If you do not have time to stew the meat, traditionally the meat is stewed for 1-2days, this is a nice shortcut.
Note:
I am using an 8qt Instapot! Once the meat has been placed in the pot, I added 75ish oz of water which is approximately 2-2.5qts.
Instructions:
Take your stock pot and start to boil water for the blanch! The pot should be big enough to put ALL the meat.
Once the water is at a boil, blanch the meat for 10-15min
Skim off the scum periodically!
Once blanched, strain out the meat rinse, and throw out the water.
While you are boiling the water for the blanch, prepare and flame roast aromatics!
Onions, peeled and split (If small, peel and roast whole)
Shallots, peeled and split
Ginger, skin on and sliced
Place into a cheese cloth satchel tie off with Butcher’s twine:
Cinnamon Sticks
Star Anise
Cloves
Coriander seeds
Place blanched meat, roasted aromatics, and satchel to the pot. Add water to the max line in the Instapot, everything should be covered with fluid. Season with NaCl and fish sauce. You have not added the vegetables at this point. Set the timer for 1hour and 30minutes…read a book or do laundry.
Once the pressure cooker has done it’s magic, safely release the pressure by opening the release valve. Open the pressure cooker and taste the broth. Now is the time to adjust the taste, add the vegetables and close the pot up and let the heat do the job, no need to pressure cook again, if you are adding green leafy vegetables. If you are adding carrots, you may need to pressure cook for 3-5min to cook the carrots.
Cook your noodles. For the ramen, it is 3min in boiling water, strain and place in a bowl.
Dish out, garnish and enjoy!

The MEAT
I generally have oxtail in the chest freezer. Oxtail stew is a family favorite so I try to keep it in stock. NY Strip was also available as we had that several months ago. If you are wondering both were purchased at Costco.

Garnish! Diced Scallions
Finely dice these spring onions. The people you are serving can choose how much or little…no judgement if they don’t use the garnish.

Cilantro…
Yeah…they should be finely diced but I was rushing. It is what happens when you multitask.

Post 1 hour and a half
First taste test. Added at this point: fish sauce and coriander (forgot to add initially). Note the chard ginger and satchel.
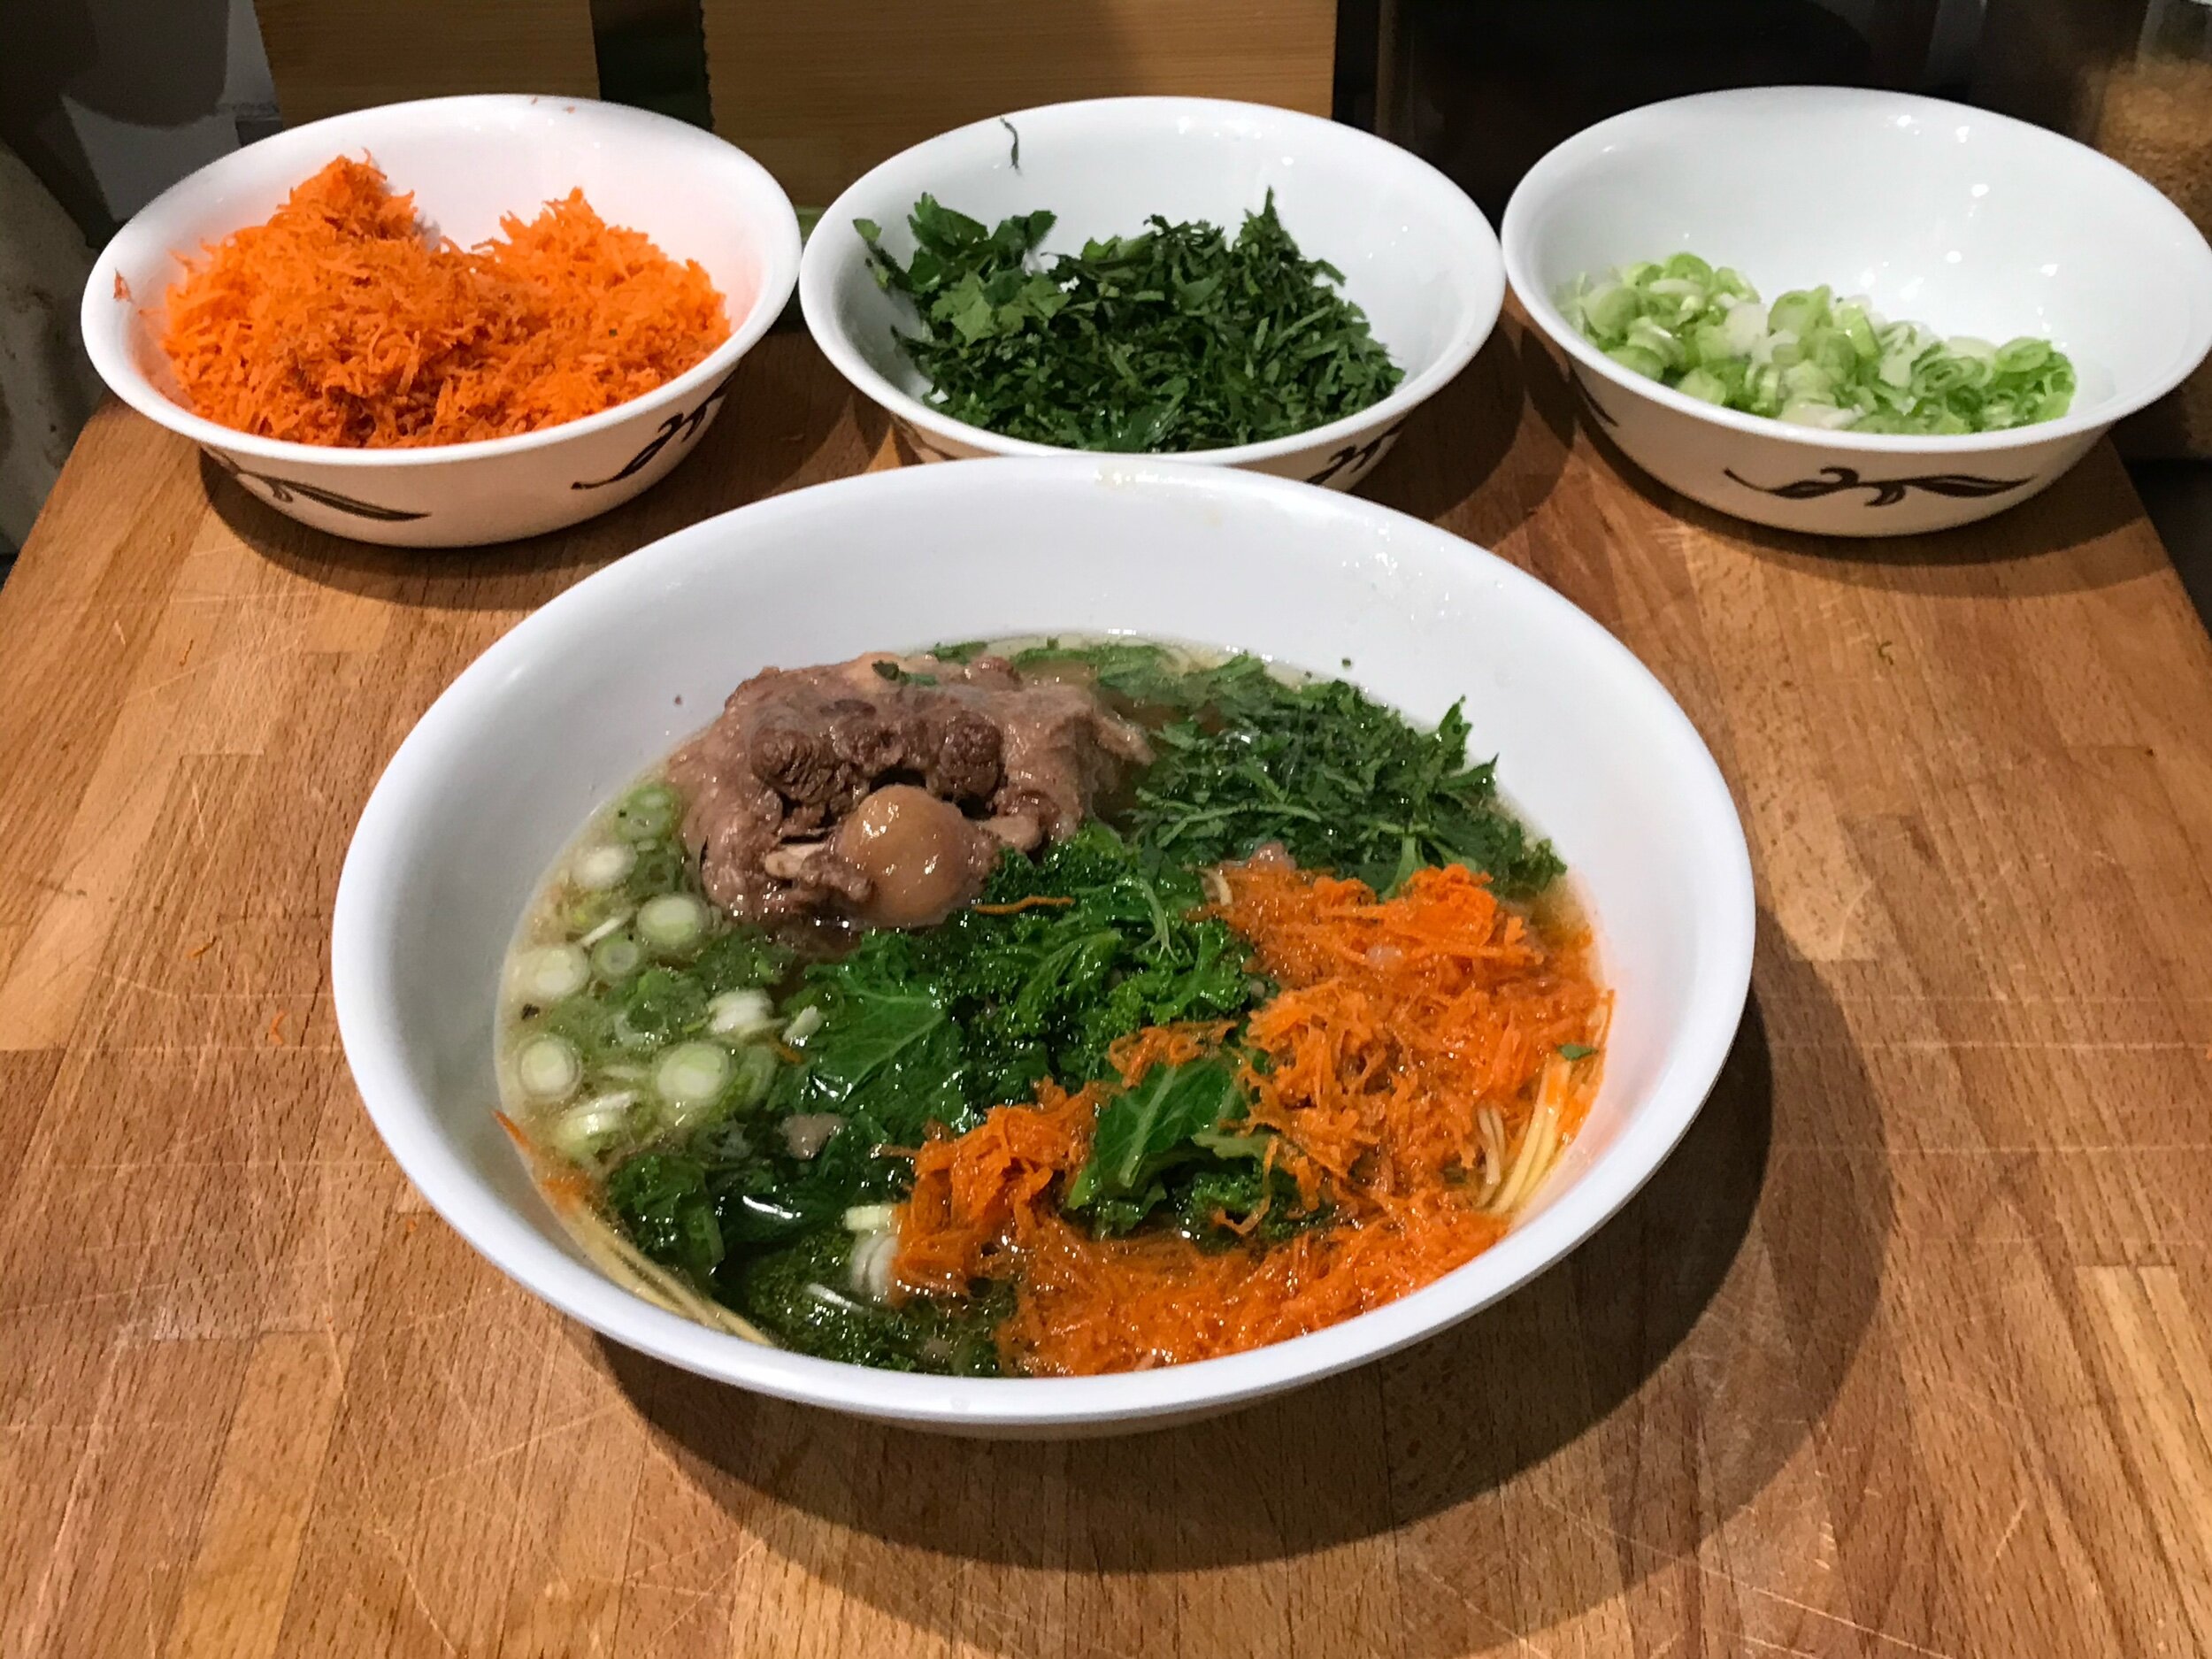
The finish product..
So delish! Well received and will be a staple on The Menu!
This was truly fun to make as I have been hankering for that meaty Southeast Asian broth. I hope you give this one a shot and like all that recipes I posts, these are guidelines…
Experiment and make it your own!
T

Surplus of Carrots = Carrot Cake
Based on NYT Recipe
Dry:
2 cups of all-purpose
2 teaspoons of baking powder
2 teaspoons of baking soda
2 teaspoons of ground cinnamon
3/4 teaspoon of NaCl
3 cups of grated carrots (~ 5.7oz/dry cup)
2 cups of sugar
Wet:
4 Large Eggs
1/2 cup of Canola Oil
1/2 cup of toasted butter (1 stick of butter was my deviation from the original recipe)
1 teaspoon of vanilla extract (Recipe did not call for this…I added)
Instructions:
Turn on your oven and heat to 350F…this is first because if you are like me, you forget and then have to do this later
Grate your carrots! You can use a food processor if you have the grating attachment. I do not have the grating attachment…BOO-HOO! So, I had to risk my fingers and knuckles with a manual grater.
Sift and mix the flour, baking soda, baking powder, ground cinnamon and NaCl into a separate bowl.
Brown your butter….DO NOT BURN YOUR BUTTER
Mix sugar, oil and (COOLED) brown butter until smooth
Add your eggs one at a time and the mixture should become smoother
Add your carrots
Add your dry ingredients, mix until all dry ingredients are mixed in and the mixture is smooth. Use a whisk by hand or paddle by mixer
Pour your mixture into a cake pan, I used loaf pans and bake at 350F for approx. 40-55min.
Check the cakes at 20min mark and rotate so it cooks evenly
At the 35-40min mark, check if it has cooked. Stick a knife somewhere in the middle. When you pull the knife out, it should come out relatively clean. Meaning there should be no signs of liquid or excessive moistness on the knife.
Once done, let it cool for 5-10min in the pan. The cake should retract a little, enough to release from the sides. Take a spatula and work around the sides to fully release the cake. Place the cake on a cooling rack and let it cool down further or…eat it before anyone else asks for some.

Manual Grating Carrots
Use the finest grate. Place the carrot tip side down onto the grate, the thicker part of the carrot will help with holding and control. With medium pressure down, grate the carrots in a circular pattern.
Note the texture of the carrots, it should be very moist.

If you have a scale…
Weighing your grated carrots is infinitely easier then trying to measure using a measuring cup.
Do not forget to tare or zero the scale with an empty bowl! This way the scale will be set to 0 with an empty bowl and provide you with the weight of the carrots only.
A little math is involved here..approx. 5.7oz per cup of grated carrots. Looking for 3 cups, that is equivalent to 17.1oz or 1lb 1oz (16oz per lb).

Browning Your Butter
Over medium heat, brown place your butter and heat. Things to notice in this pic is the froth that butter makes will make it difficult to determine the brownness of the butter. Stir regularly and remove from heat to inspect, like what I did in this picture. Note the particles at the uncovered aspect of the pot. Those little brown bits are the buttery magic we are after. You will also see some toasted particles in the froth. After this inspection the butter was browned to my desired brownness in another min or two.
The process requires attention as butter is very easy to burn. You do not have to keep the pot on the heat. I suggest picking it up and inspecting it. Use a whisk so it scraps off the deliciousness from the bottom of the pot.

Mix!
Difficult to see…but you want the dough to be smooth and ALL the dry ingredients thoroughly mixed.

Pour in to your forms and bake…
We ended up with two loaves…by the end of the night, there was 1 loaf (minus the a little of the top end so it fits in the container).
Needless to say, The Motley Crew loved this and the toasted butter gave some delicious notes to the taste. So this recipe is a Menu keeper.
Experiment and make it your own…
T

Ube Pancakes…
The Motley Crew’s breakfast yesterday. I was supposed to make Ube Halay (Ube Jam) but I made an executive decision as the boys were hungry.
Dry:
4 Cups All Purpose Flour
4 Teaspoons of Baking Powder
1/2 Teaspoons of NaCl
1-2 Tablespoons of Sugar
Wet:
4 Eggs Separated!
3-4 Cups of liquid (I used 1/2 Whole Milk and 1/2 Coconut Milk)
4 Tablespoons of melted then cooled butter
1 Teaspoon of Vanilla Extract (You could add Ube Extract to intensify the flavor)
16 ounces of grated Ube (I used frozen)
Directions:
Sift all the dry ingredients together into a bowl
Separate the eggs out with yolks into the bigger bowl (this will be your mixing bowl in the end)
Beat the egg yolks and add the extract (of your choice) and half of the 3-4cups of liquid.
Note: control the amount of liquid as this will determine the thickness of your pancake!
Add in the butter and the Ube
If you feel that the mixture is thick, add more liquid
Add your dry ingredients to the blended wet ingredients and mix.
It should be thick…a whisk should be able to mix it with some resistance.
If there is a lot of resistance slowly add more liquid till the desired consistency
Whip the egg whites to a stiff froth
This adds lift to your pancakes
Fold in the egg whites into the mixture and warm up your skillet
Skillet should be hot but not enough to scorch your butter when added or Pam or whatever oil you are adding to create that nonstick surface.
Cook until the edges brown then flip over
Serve with a pat of butter and some warm Maple Syrup
Optional additions:
Chocolate chips (the boys loved this)
Bananas
Diced nuts of your choice
Please keep in mind that I fed 3 adults, 1 child and a teenage boy…I have leftover batter for the teenager tomorrow about, 1 quart. If you are making this for yourself or for that special person…cut the recipe in half.
The above bullet points are guidelines and pancakes tend to be a very forgiving recipe that you can get away with eye balling measurements and adding of the option of your choice to play around with the taste and or nutritional content.
Play around with it and make it your own!